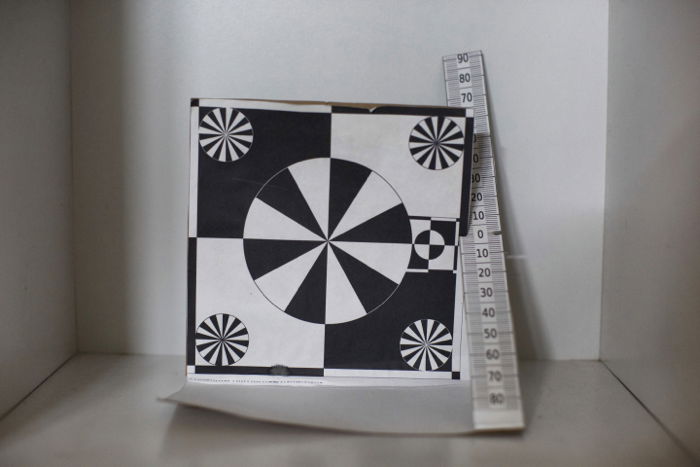
A camera focus test is a way to determine if there is an issue with your camera’s autofocus. This can be helpful in troubleshooting problems you may be having with getting your photos in focus. There are a few different ways to do a camera focus test, and we’ll show you how to do each one.
Camera Focus Test: What Can Cause Your Camera to Lose Sharpness?
Some factors can lead to a loss of sharpness in your photos. These factors all come down to how well you look after your equipment. Think of it like looking after your car. If you service it well and keep it out of the elements in the garage it will last longer.
Camera lenses follow the same logic. Look after your equipment, and keep it clean to reduce the chance of problems.
Take a look at the following, as these are all potential reasons for an autofocus issue.
- Mileage – Cameras have moving parts, and the more you use them, the older they get. After some time, things will wear out or lose position. This could lead to a loss of sharp autofocus.
- Shock – Accidents happen, and sometimes a lens gets dropped. As a photographer, there is no bigger clanger. Even if you didn’t drop the lens, the damage could happen while it’s in a bag, if not handled with care. Any shock damage can result in loss of sharp autofocus.
- Water – There are times when you need to take your camera to places that put it at risk to get compelling photos. Taking a photo of the sea where there is spray from the waves, or out on a rainy day are ways water could get into your camera. This water could then harm components in your lens or camera body that cause loss of autofocus.
Other Problems That Could Affect Sharpness
It’s always worth checking autofocus, but there are a couple of different reasons your photos aren’t sharp. They’re apparent reasons, but worth a reminder before doing an autofocus test.
- Shutter speed – If your shutter speed is too slow, you’ll have a blurry photo. This isn’t a focus issue but will cause a loss of sharpness.
- Focal position – Make sure that you are telling your camera to focus on the correct place. Use the camera’s selective focus to ensure the camera focuses where you want it to.
- Light – In some situations like low light, the camera may find it hard to get sharp autofocus. This could lead to the camera missing the focus.

The camera focus is now aimed at the eyes. This needs to be sharp on the eyes, if not, then fine-tuning will be needed.
How to Test Your Camera for Autofocus Issues
This will take several steps, and first you’ll need to prepare some equipment. This test is somewhat like a science experiment, so let’s look at the apparatus, method and results.
Apparatus
The following items will be needed to carry out this autofocus test.
- Tripod – Keeping your camera in position is essential for this test. You need your camera to stay in the correct place in relation to the focus test card.
- Camera body – Of course you’ll need your camera body. The focus problem is likely with your lens, but it’s also possible it could be in the camera body.
- Lens – If you feel the lens is not giving you sharp focus, test several other lenses that you know focus well. With this method, you can make sure it’s the lens that’s the problem and not the camera.
- Focus test card – You’ll need to download and print the following test card. Once you have this assemble it using the instructions, some glue, scissors and a piece of card. The advantage of this particular test card is it allows you to see if it’s back or forward focusing and by how much.

Method for Testing Autofocus
Now that you have your equipment ready, you’ll need to set things up and carry out your test photos.
Finding the focus
- Place the card in a well-lit area, somewhere your camera will find it easy to focus on the card. You should avoid backlighting the card, as this may affect the camera’s ability to focus.
- Now, place your camera the correct distance from the test card, 50 times the focal distance of the lens. For a 50mm lens, your camera should be 2500mm (2.5 metres) from the card.
- Open the aperture on your lens up to its widest.
- Now, manually focus the lens to infinity. Then allow the camera to focus on the card using autofocus.
- Take the photo of the chart.
- Repeat step 3 and 4 several times, so you have photos to compare.
- Upload your photos to a computer, and look at the results on a larger screen. Use the ruler to determine if the camera is back or forward focusing.
- Use other lens and repeat steps 3 to 6. The results of this will be used to determine if the lens or the camera has an issue.
Correcting the Focus
Assuming the focusing issue is with the lens, you may be able to take the following steps to correct the problem.
In this case, a Canon camera‘s settings will be used to demonstrate the workflow. If you’re using a camera with a different brand, a similar process is possible, consult your camera’s instruction manual for details on this.
- Determine from your test whether you have back or forward focusing issues.
- On your camera, identify the AF micro-adjustments menu option. In the case of the Canon 5D Mk3, this can be found by pressing “menu”, then clicking through to the last of the 5 bars on AF. Then at the bottom of this menu, you will find the correct button. Other models will have this option in a different location, so refer to your manual to see this.
- Select this option. Now, select the adjust by lens option. To change you will need to press the info button.
- Now, you will have the option to change the focus position of the lens. To focus further away from the camera, which you will need for forward focusing, select a positive number for this correction. If your camera is back focusing, you will need to choose a negative number. This number will tell the camera to focus closer to the camera.
- Once you have made your adjustment carry out another test on your lens using the “find the focus” instructions from above.
- If your lens is now sharp, congratulations it’s time to start photographing! If there is still a problem, adjust the lens until the focus is sharp.

Result of Autofocus Test
Your camera is now fixed and ready to use, or that is the hope. In extreme cases, the focus of the lens could be so far off that it suggests a more critical error with your lens.
If the micro-adjustments to autofocus are not enough, then you will need to take your lens to be serviced.
Common Questions About Testing a Camera for Autofocus.
How Do I Fix Autofocus?
The easiest way is to take your camera to a service center and allow an expert to look at it.
There are ways you can fix the problem on your own, though. To do that you’ll need to find out if your lens is back or forward focusing.
Once you know this, most cameras have a lens focus adjustment. You can use this to correct the problem, as long as it’s not too drastic.
How Do I Get My Camera to Focus?
Autofocus is often used to achieve camera focus. Most cameras have different ways to accomplish this. They may track a moving object, or you could choose a specific point for your camera to focus on.
When your autofocus is working well, this will achieve a sharp focus. An alternative to this is to use manual focus and then zoom in using live view to your focus point to make sure it’s sharp.
Why Does my Phone Camera Not Focus?
There are any number of reasons a smartphone can stop focusing, and they’re all usually down to wear and tear.
Did you drop your phone? If you did the shock from the impact could have effected your camera’s ability to focus. Water damage can also prevent your camera from focusing.
Finally, a software glitch could be causing the problem, in which case resetting your device could fix the issue.
How Do You Know If Your Camera Lens Is Damaged?
It is essential to determine if your lens has a problem with the auto-focus slipping, or whether it’s damaged.
If you carry out the steps in this article and you’re still not getting sharp images, you likely have a defective lens.
Did you drop your lens, or was it not well stored? If the lens has been subject to shock damage, or water damage, then you will need to take it to a service center.

Conclusion
Having a lens that misses focus can be frustrating, especially when you miss a great moment because of it.
You can only use manual focus to get a sharp image when things aren’t moving. Manual focus is not so useful in the dynamic world of street photography.
This guide allows you to identify the problem you have, and then how to fix it. Having confidence in the gear you’re using is a massive advantage in photography.
Keeping your autofocus sharp is essential.
At ExpertPhotography, we value your opinions, have you needed to fix issues like this before? What alerted you to the problem, and how did you go about fixing it?
As always, please share your ideas in the comments section of this article!
