Vignetting in photography can be a sign that an image has been captured or edited in an unprofessional way. Unwanted vignetting can be a pain. But sometimes, you may want to keep or even add vignetting to an image.
In this article, we’ll have a look at lens vignetting, types, tips and how to get rid of unwelcome vignetting.
What Is Lens Vignetting?

The word vignette was first used in English in the 18th century. The term originally referred to designs on the borders of pages in books. Later on, early photographers adopted the term to describe an image that lost clarity at the edges.
Today, vignetting refers to a darkening effect seen around the edges of a photograph.
Common Questions
Love it or hate it, vignetting is a striking occurrence. It can, without question, give certain types of images a unique look.
Here are the answers to a few commonly asked questions about vignetting.
Here are the answers to a few commonly asked questions about vignetting.
What Causes Lens Vignetting?

Vignetting can occur due to camera settings and the properties of camera lenses. Camera accessories can also cause lens vignetting.
What Are the Types of Lens Vignetting?
Optical vignetting is when the lens barrel blocks light. It also refers to light taking longer to travel from the outer edge of a lens to the sensor.
Another type of vignetting is called mechanical vignetting, which can occur when something obstructs the light from the sensor. This is often caused by lens accessories.
The third type that is important to mention is natural vignetting. This type of vignetting refers to the angle of light that travels from the lens to the image sensor. You are more likely to find natural vignetting in low-end DSLR cameras, where the software coding can cause this issue.
What Other Types of Vignetting Are There?
Other types of vignetting include pixel vignetting and artificial vignetting.
Pixel vignetting is a symptom of digital sensor construction. The pixels on a flat image sensor don’t all receive light from the same angle. The pixels in the corners and edges get less light, which can cause vignetting.
Artificial vignetting is the introduction of vignetting to an image in post-production. It can create a vintage feel in images. Photoshop and Lightroom are perfect for achieving this effect. It is also a popular feature on Instagram and social media filters.
When Is Vignetting a Good Thing?

Vignetting is a useful tool for photographers to draw attention to certain parts of an image. Vignetting can also help focus on the subject when the background or edges of the picture are a distraction.
In addition, vignetting can introduce a certain type of retro feeling to a photograph.
Keeping or introducing a vignette is a creative decision – it’s up to you whether you want to remove, enhance, or create a vignette.
How Do You Create Artificial Vignetting?

Post-processing software like Photoshop and Lightroom have options to create artificial vignetting.
Lightroom is a good option to use because it is possible to copy and paste the settings you like to another image. This means it is easy to create a consistent vignetting effect for many images. We recommend using the Post-Crop Vignette tool. Here is a tutorial for creating vignetting in Lightroom.
In Photoshop, you will find several methods for adding vignetting. The Lens Correction Filter, Levels layer, and Solid Color Layer are most often used. For vignetting effects in Photoshop, check out the link here.
Do Step-up Rings Cause Lens Vignetting?
A step-up ring is a device that allows you to use filters with a wider thread-size than the lens you are using.
Although step-up rings angle outwards, there is still the possibility of vignetting.
How Do I Get Rid of Lens Vignetting?
There are a couple of methods for getting rid of lens vignetting. While some methods reduce vignetting in-camera, others rely on post-production.
Let’s have a closer look at these methods below…
How to Remove Unwanted Lens Vignetting
Check for Lens Obstructions
If you are encountering strong vignetting, check the front of your camera lens first. Accessories like lens hoods can get dislodged or misaligned and show up in your photograph.
Also, stacking filters together or using incompatible accessories can cause vignetting.
Stop Down Your Lens

Vignetting is most obvious at wide apertures. To reduce vignetting, try to stop down your lens to a narrower aperture.
Use In-Camera Vignette Control
Many DSLR‘s have a vignette reduction option in the menu. Enable your camera’s vignette reduction to reduce the appearance of vignetting. This is great when shooting jpg, but it has no effect on RAW images.
Remove Vignetting in Post Production

There are many ways to combat lens vignetting in post-production.
The easiest way is to crop an image in an image editor so that the vignette isn’t seen. This only works if the vignetted area can be removed without ruining the composition of the whole image.
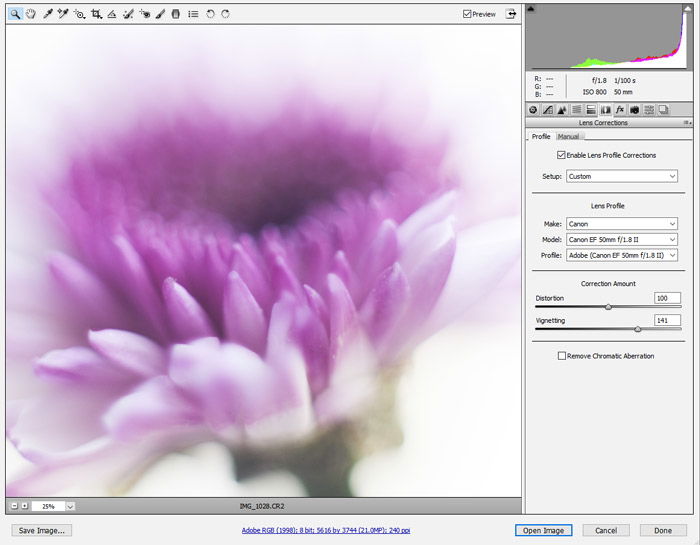
In Lightroom, use the Lens Corrections option in the Develop Module.
In Photoshop there is a Lens Correction option under the Filter drop-down menu. You can use the Vignetting Tool to edit out the black areas of your image.
The Adobe Camera RAW utility also has a Lens Correction panel.
Conclusion
Whether you like it or loathe it, vignetting is a common presence in photography. There are plenty of ways to incorporate vignetting into a photograph. But there are also ways to get rid of vignetting if it’s unwanted.
