Switching to manual mode can be daunting for beginners. And there are other shooting modes that make things a little easier for shooting a great shot. But when it comes to taking the perfect shot, it’s best to take full creative control and shoot in manual mode.
Lots of professional photographers make using Manual mode seem easy. But if you’re worried about how to get started, we’ve got all the tips you need. And if you’re shooting digital photography, you’ll never run out of film, making it cheap, fun, and easy to experiment.
Continue reading for everything you need to know about shooting in Manual mode.
How to Shoot in Manual Mode
There’s no problem with shooting in auto mode when you’re a beginner. It’s a great way to get used to the camera, and auto mode can produce decent results. But it’s important to push yourself to the next level by switching to manual mode.
Auto mode is like using training wheels on your bike. They make life much easier and give you an easy ride, but at some point you’ll have to take them off. It can be daunting, but it’s an important step if you want to improve.
Manual mode gives you complete control over your exposure settings. That means you have complete creative control, giving you more influence over how the final image looks.
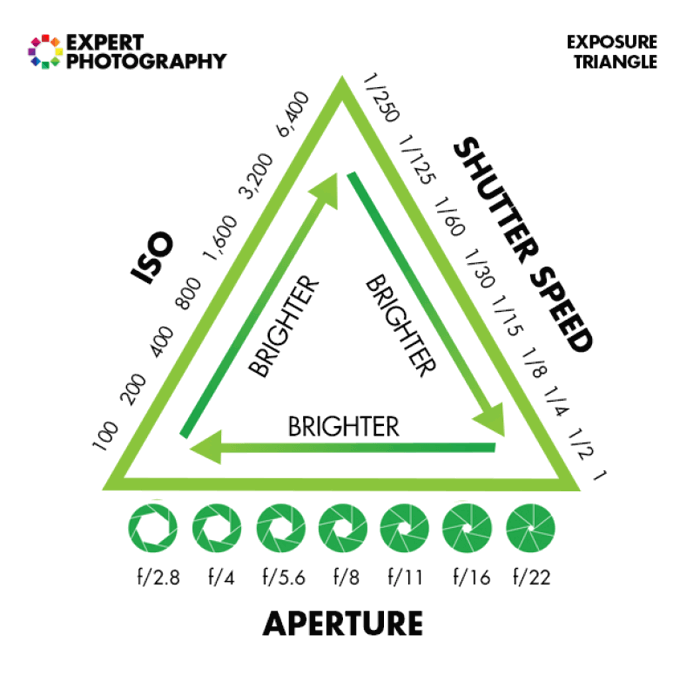
There are three essential elements to exposure and they make up the exposure triangle. They are ISO, aperture, and shutter speed, and manual mode gives you complete control of all three.
Balancing the three main settings for a perfect exposure is the main objective when in manual mode. But having control of these settings also gives you more influence over other aspects of photography. You can also control depth of field, motion blur, and image sharpness.
We’ll go into more detail on the three exposure settings, how they work, and how you can use them in the following sections. Keep reading to master shooting in manual mode.
Manual Mode Settings and the Exposure Triangle
Now we’ll look at each manual setting in more detail. We cover everything from how the settings affect your exposure to how to understand the values on your camera.
Aperture
The aperture is the hole in the lens that opens to let light fall on the sensor. Pretty much every lens has an adjustable aperture. Mirror lenses are an exception to this, but most lenses have a way of making the aperture smaller or larger.
The size of the aperture is expressed as a number, and known as the f-stop or f-number. A lens description always includes the largest aperture possible. For example, the Canon RF 50mm f/1.8 STM has a maximum aperture of f/1.8.
The minimum aperture is less important and will be f/22 for most lenses. Some will go smaller, but that’s unusual.
You need to be aware that larger apertures are denoted by smaller f-stop numbers. As you can see from the examples above, the narrower aperture has the f/22 f-stop and the wider aperture has an f/1.8 f-stop.
You can see the full f-stop scale in the graphic below.
Changing the aperture has two main effects. The larger the aperture, the more light passes through the lens barrel and onto the sensor.
If you’re picture is too dark, or underexposed, you need to use a smaller f-stop/wider aperture. If the picture is overexposed, stop down to a larger f-stop/narrower aperture.
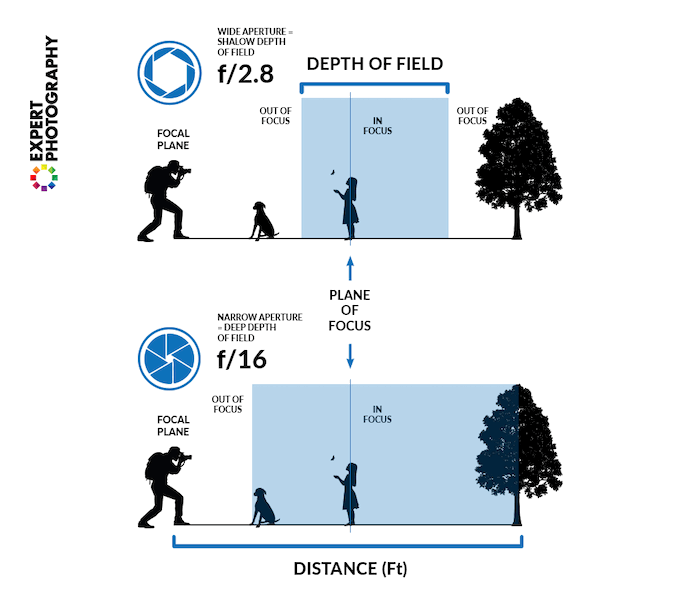
The aperture also controls the depth of field, which is how much of the scene is in focus. The wider the aperture, the shallower the depth of field. Use a wide aperture to show your in-focus subject against an out-of-focus background.
On the other hand, you would use a smaller aperture to get as much of the shot in focus as possible.
It’s worth noting that most lenses lose some sharpness with apertures smaller than f/8 or so.
Shutter Speed
The shutter speed is how long the shutter stays open. This is usually measured in fractions of a second but can go a full second or longer for some shots.
The faster the shutter speed, the less light gets to the sensor. Using a slower shutter speed allows more light into the camera.
Modern digital cameras sometimes have shutter speeds that boggle the mind. The Sony a1, for instance, has a maximum shutter speed of 1/200,000 s. That’s fast enough to take 100,000 pictures during an average lightning flash!
On most cameras, you’ll usually find a maximum shutter speed of 1/4000 s or even up to 1/8000 s on some high-end cameras. That’s fast enough for some impressive photographs.
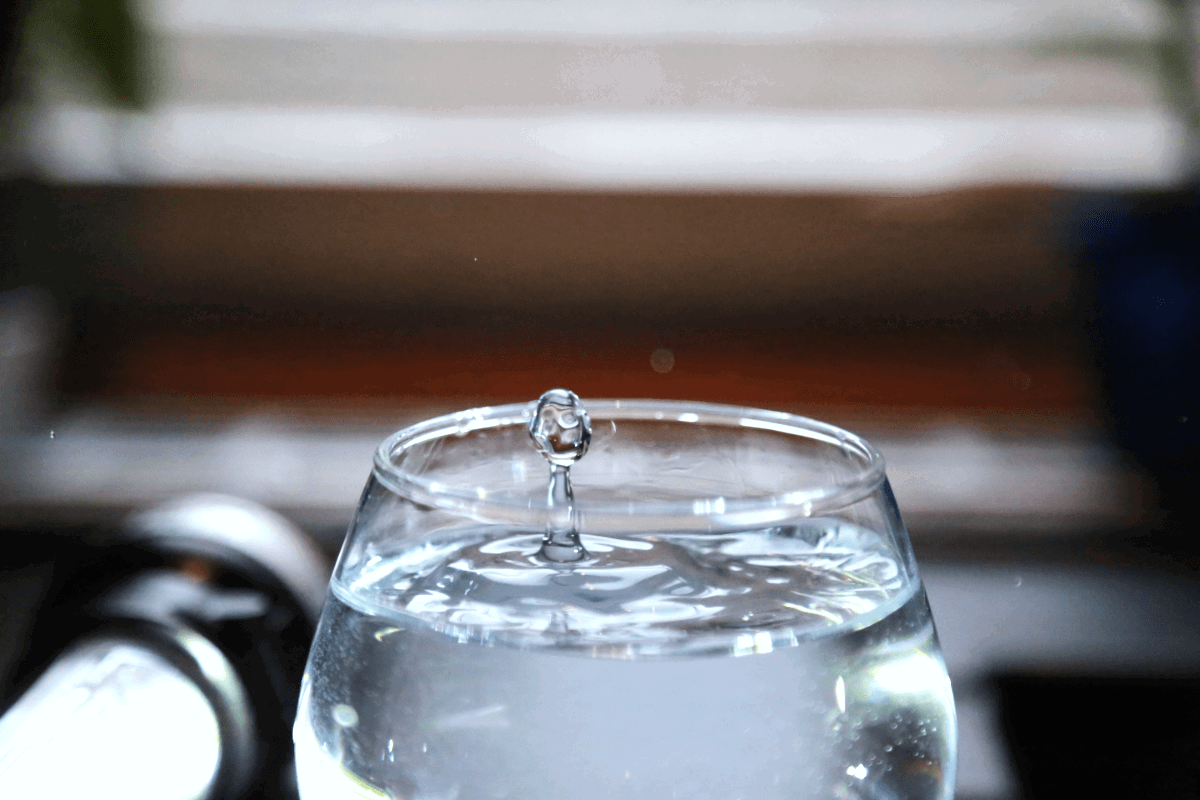
Using a fast shutter speed is important for two things – preventing blurry photos caused by camera shake and preventing blurry images caused by a moving subject.
Choosing a slower speed allows deliberate blur, which can be an effective way of showing speed and movement within a photo.
With cameras and lenses that have no image stabilization, a rough guide to avoid camera shake is this: choose a shutter speed number that is at least the focal length of the lens. So, for a 50mm lens, you need 1/50 s or faster. With a 200mm lens, you need 1/125 s or faster.
ISO
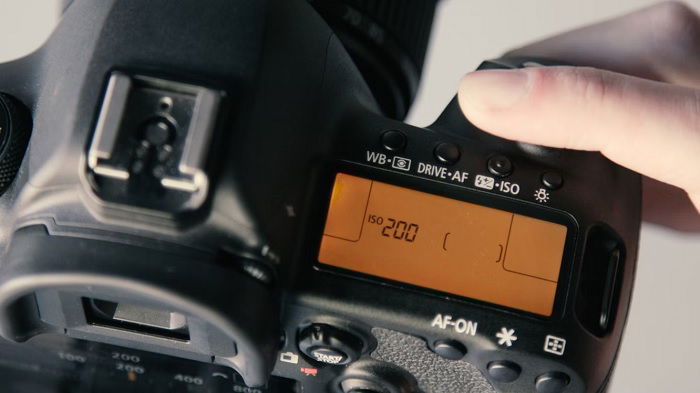
The ISO number tells you how sensitive the camera sensor is to light. On digital cameras this is an adjustable exposure setting.
In the days of film, the ASA/DIN of the film told you how “fast” it was. In other words, it tells you how sensitive it is to light. The ISO number has replaced the ASA/DIN numbers, although ISO numbers are identical in their value to ASA. And they still determine how sensitive the film is to light. Or more usually, how sensitive the digital sensor is to light.
If you came to modern digital cameras from the world of film, you’d be amazed at how “fast” sensors can be. A fast ISO film would be 400, maybe “pushed” to 800 or even 1600 for very dark settings. But you’d pay the price with lots of grain in your image.
These days, ISO settings of 12,800 are completely normal. Even entry level cameras have ISO settings of 25,600 or more, allowing you to shoot in darker situations.
However, there is a downside to using high ISO settings. The higher you go the more lightly it is to experience digital noise. This is a grainy texture that has a negative effect on image quality. You lose clarity, definition, and color accuracy when there’s a lot of digital noise.
Thankfully, modern cameras deal with digital noise very well. You can use high ISO levels like 12,800 and experience very little noise. But using low ISO settings still gives you the best image quality.

Exposure Triangle
Aperture, shutter speed, and ISO are the three components of the exposure triangle. Capturing a perfectly exposed image is about balancing the three points of the triangle.
Thinking about the manual mode settings in this way helps you understand their relationship to one another. You need to find a balance between all three to expose your image correctly. And adjusting one setting has a knock-on effect on the other two.
The stop system makes this easy to understand. All three of the settings are measured in incremental “stops”. This means you go up and down the scale in equal measurements, and one stop in one setting scale is equal to one stop in another setting scale.
For example, if you have a well exposed image but you decrease your ISO for better image quality, you have to use a slower shutter speed or wider aperture to compensate.
Let’s say you’ve found a good exposure with these settings: ISO 400, f/8, and 1/500 s. However, you want to reduce your ISO to 200 to improve image quality.
That means you’re reducing the ISO by one stop. Therefore, you need to change the aperture or shutter speed by one stop to compensate.
Stopping the aperture down from f/8 to f/5.6 is one option. But if you don’t want to reduce your depth of field, you can slow the shutter speed down one stop. That change would be 1/500 to 1/250.
Your new settings would be ISO 200, f/8, 1/250. Even though two of the three settings are different from our original combination, you have the same exposure balance and your photo will still be perfectly exposed.
Mastering Manual Settings
This section looks at how to find the best exposure setting in different conditions and situations. Reading this, you’ll have a better understanding of how to find the best settings to suit your needs.
How to Set Aperture
A narrow aperture, such as f/16, will keep almost everything in focus because it has a large depth of field.
It’s most useful for landscape photographers, who might use a narrow aperture to show as much detail as possible in the foreground and background. But there’s always a limit to sharpness.
With f-numbers higher than f/22, you start to get diffraction effects. When that happens, the finer details won’t be sharp anymore.
Shooting a photo with wider apertures, such as f/1.8, will have a shallow depth of field. This means only part of the scene is in focus. The foreground and background will be out of focus.
Portrait photographers tend to use a wide aperture to keep their subject in focus while the background is out of focus. This technique gives you a “bokeh” effect.
It’s also commonly used in food and product photography, and can be used in street and travel photography.
How to Set Shutter Speed
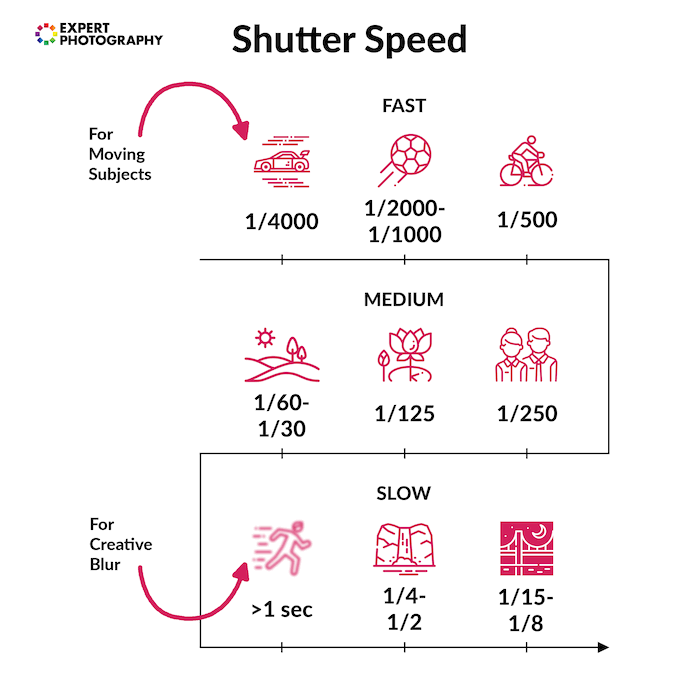
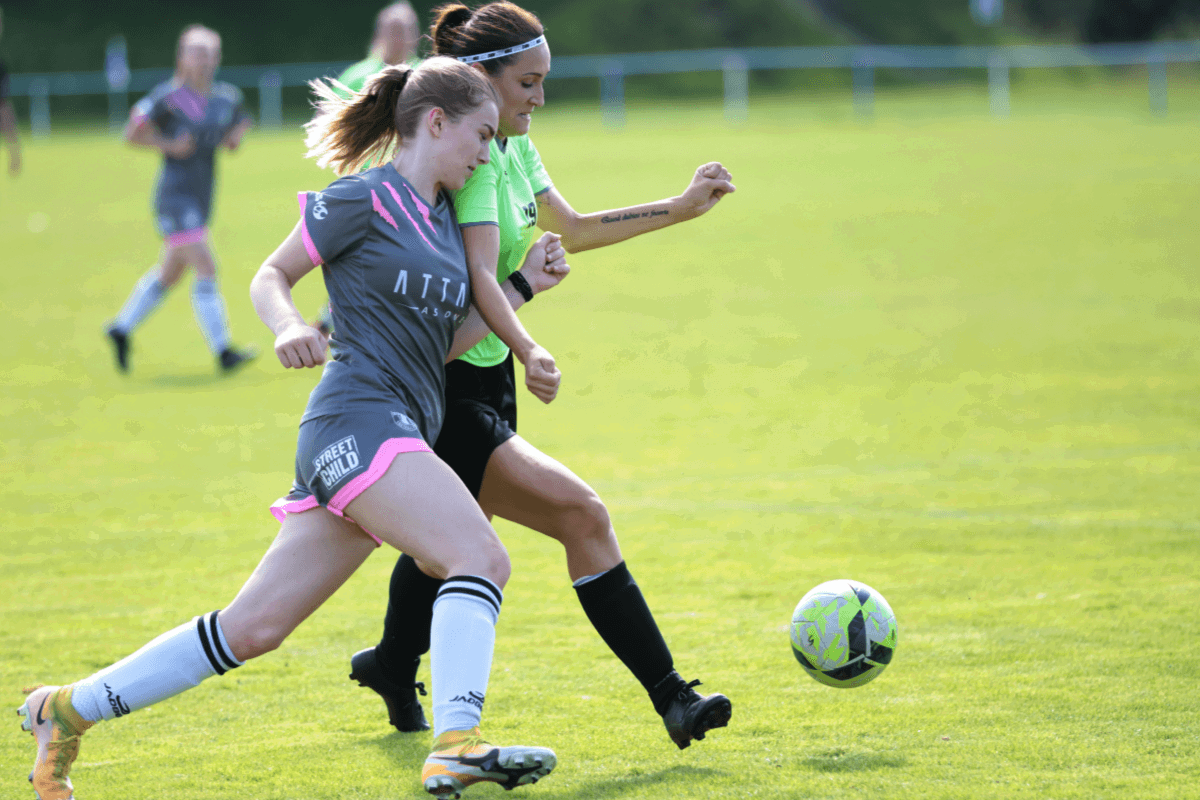
Using a fast shutter speed is the best way to avoid motion blur or camera shake. Faster shutter speeds “freeze” action, allowing you to capture sharp shots of fast-moving subjects.
Sports and wildlife photographers use fast shutter speeds because their subjects move quickly. If they use a shutter speed that’s too low, the athletes or animals will appear blurred in the final image.
Using faster shutter speeds means you often have to compensate by increasing the ISO level.
You can also intentionally use slower shutter speeds to achieve the motion blur effect. This can create a sense of pace and energy in your images.
But you need to be careful not to set your shutter speed too slow when shooting from hand (without a tripod).
If you use a shutter speed slower than 1/60 s, the whole picture will be blurry due to camera shake. That means you should always shoot at 1/125 s or higher when shooting from hand.
Using a tripod gives you more freedom with your shutter speed setting. You can keep the shutter open as long as you need to, and there’s no risk of camera shake. Moving subjects will still be blurred with slow shutter speeds, but still objects will remain sharp.
Some cameras have built-in image stabilization systems. These also allow you to use slower shutter speeds with a reduced risk of blur, sometimes offering four or five stops of compensation.
Lenses, too, sometimes have built-in image stabilization. Both these systems help you capture sharp shots with slower shutter speeds.
How to Set ISO
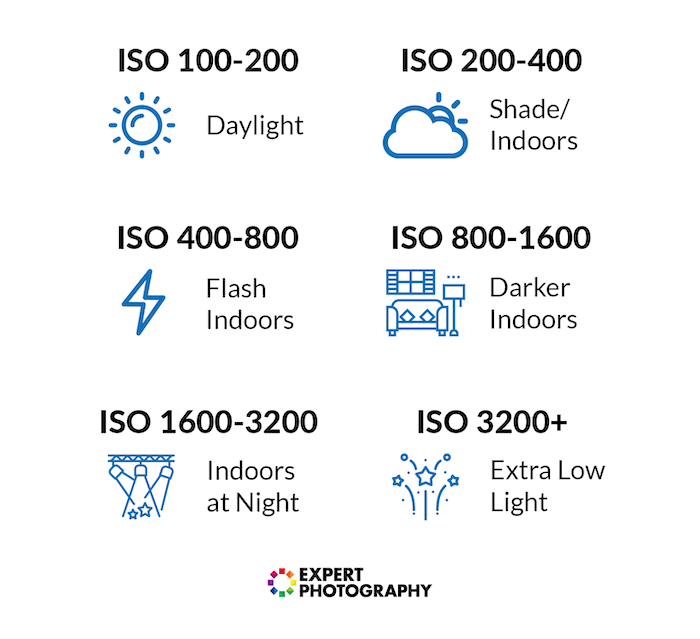
The lower the ISO number, the better the image quality is in smoothness, contrast, and color rendition. In general, it’s a good idea to keep it as low as possible.
But there’s a trade-off. If you’re working in low light, you need the extra brightness from a higher ISO. You have to balance brightness with image quality.
You start to see significant noise beyond 6400 ISO as a general rule. So that’s when you might want to use a wider aperture or longer shutter speed. But it depends on your camera. Modern, full-frame cameras perform much better at high ISOs than older models.
Most cameras will offer you the option of Auto ISO. This means that while you concentrate on getting the exact shutter speed and aperture you want, the camera adjusts the ISO so the exposure is right.
How to Shoot in Full Manual Mode
The best way to get full control over your exposure is to use manual mode. Assess the scene, and use your judgement to select the appropriate ISO.
Once you’ve done that, it’s simply a case of choosing the aperture and shutter speed you need for your photos.
And as we’ve seen, the type of photo you want will determine your choices. For example, if you’re shooting sports or fast-moving wildlife, you need a fast shutter speed.
But if you’re shooting a still-life with a tripod, you can use slower shutter speeds since motion blur isn’t an issue.
Choosing the right aperture depends on how much light there is and how much of the scene you want in focus.
In low-light conditions, a wider aperture tends to be best because it lets more light in. But then you’ll have a shallow depth of field.
If you want a deep depth of field, use a wider aperture and adjust your ISO and shutter speed to compensate for the correct exposure.
Conclusion: How to Shoot in Manual Mode
Now’s the time to kick off the training wheels and embrace manual mode. The Auto mode life is easy, but you’ll never improve as a photographer. Switching to manual mode forces you to learn and get better.
Using manual mode won’t be easy to begin with. Balancing the exposure settings can put your head in a spin, but it’s the best way to learn. You’ll have a better grasp of the basics, more creative control, and you’ll be able to achieve the shots you’ve been dreaming of.
There has never been a better time to experiment and learn! Make a mistake, and you can both see it and correct it immediately. Switch that camera dial to “M,” make as many mistakes as you like, and learn the creative freedom that comes from Manual mode!

